

Here is what you will need:
Acrylic paint colors of your choice
Paintbrushes-small for detail, fuller for filling in
Sandpaper
Ball point pen
Print out of what ever you want on your sign.
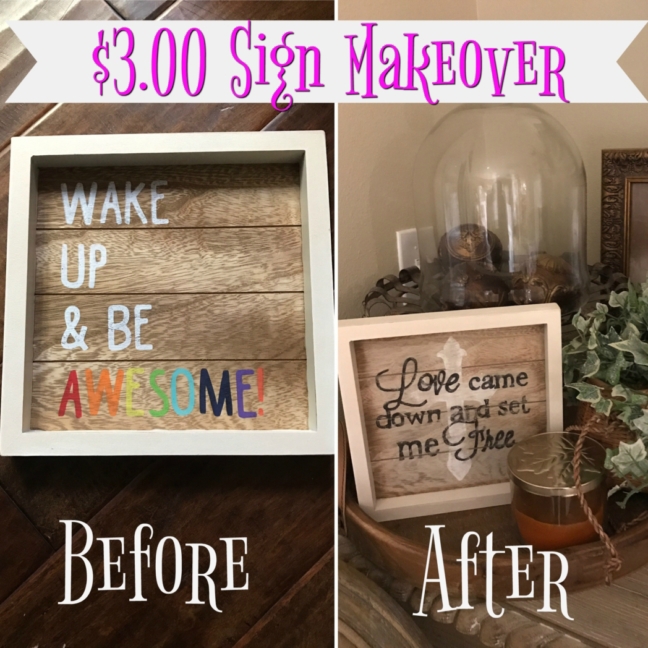
Ok, once you have all your supplies gathered the first thing you will want to do is grab your sand paper. Start sanding the painted words off of the sign, be careful not to do too much sanding so you don’t take off all the finish on the wood underneath. If you plan on painting the background don’t worry about the sanding part. You can just paint over it all. I wanted the wood background to show through on my sign. Here is what it looks like sanded most of the way.

When you complete all the sanding brush off all the dust with a dry brush over a trash can. Then wipe down the sign with a slightly damp rag. Next position and tape down your print that you want on your sign so it won’t move like so.

Next grab your pen and begin tracing your print slowly, be sure to press down firmly that way it scores the wood on the sign underneath. I only used the outline of my print. My apologies for the next picture, it’s pretty hard to see. It was kinda difficult getting the scoring to show up in the picture. If you zoom in and look closely you can see the scoring.

Grab your paint brush and paint and begin outlining your lines you traced onto the wood with the thin paintbrush and your paint. Once you finish this step you can fill in with a fuller brush if you like. You may need to do more than one coat. I only did one because I was planning on sanding the paint for a distressed look anyways.

Okay, I did two layers on my sign, the cross, and then the wording. You may be finished at this point if you only have one layer. I waited about 15 minutes for this to dry and then I lightly sanded the cross to give a more distressed look. Then I positioned my second print with the words, traced the outlines, and then painted the letters out in black. Last step was sanding the letters to finish off the distressed look. Here is what my completed sign looks like.

Such a fun and quick makeover. These would make great gifts as you can put pretty much anything you want on them in pretty much any color. Thanks for stopping by! I would love for you to share how your sign makeovers turn out.


